Highline College

Connect with Highline College

Winter quarter starts January 6. View the class schedule and enroll today for the best selection of classes.

Read&Write Activation Guide

Home/Read&Write Activation Guide
Read&Write Activation Guide 2024-05-16T13:27:59+00:00

texthelp Read&Write Activation Guide

This guide will help you activate your previously installed Read&Write app, on either Windows or MacOS, using your Google or Microsoft 365 account.

  • See alsoRead&Write Installation Guide for more information about Read&Write and installation instructions (app must be downloaded before activation).

Instructions: Activate Read&Write

Step 1

To active your Read&Write on Windows using your Google account, start by launching the Read&Write app (this may be on your desktop by default).

Screenshot of the Windows desktop icon for the Read&Write app

Step 2

Select Read&Write icon (rw) from the menu presented.

Screenshot of Read&Write app menu to activate account

Step 3

The Read&Write activation page will open using your default web browser.

Select ‘Sign in with Google.’
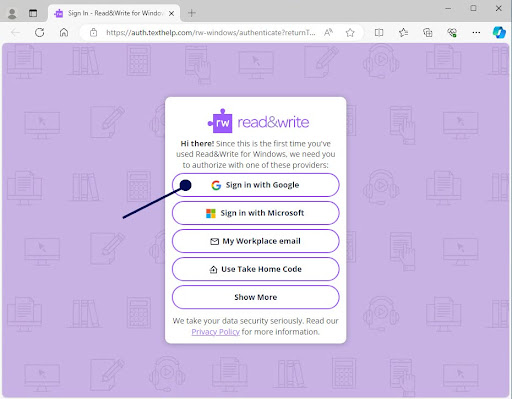
Screenshot of web browser showing the Read&Write log in page with the following option to sign in: Google (with arrow pointing to it), Microsoft, Workplace Email, Home Code, and Show More. There is a link to their privacy policy at the bottom.

Step 4

On the ‘Sign In’ screen, enter your @Highline.edu or @students.Highline.edu email address, then select the ‘Next’ button.
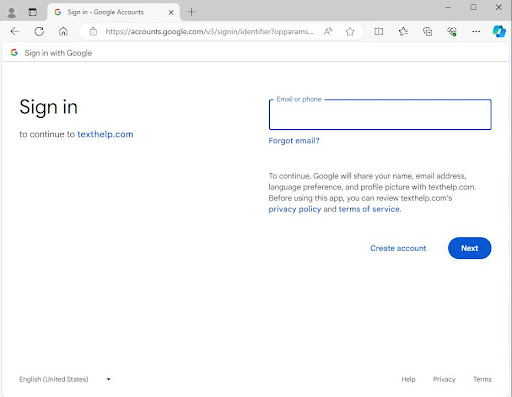
Screenshot of Windows web browser showing the Google log in screen for Read&Write asking for your phone or email address. Use your Highline email. Also has link to the Google Privacy Policy and Terms of Service.

Step 5

There are two different login prompts depending on whether you are activating with a Student (@students.highline.edu) or Staff & Faculty (@highline.edu) account:

  • Student Accounts (@students.highline.edu) should enter your myHighline account password when prompted to enter your password, then select ‘Next’
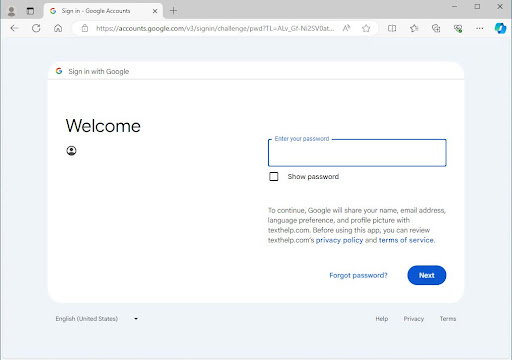
Screenshot of the google texthelp Read&Write ;og in screen for students. Has links to the Google Privacy Policy and Terms of Service, as well as a Forgot Password link.

  • Staff & Faculty Accounts (@highline.edu) will be redirected to the Highline College Okta Log In screen, and should enter your myHighline username and password, then select ‘Sign In’
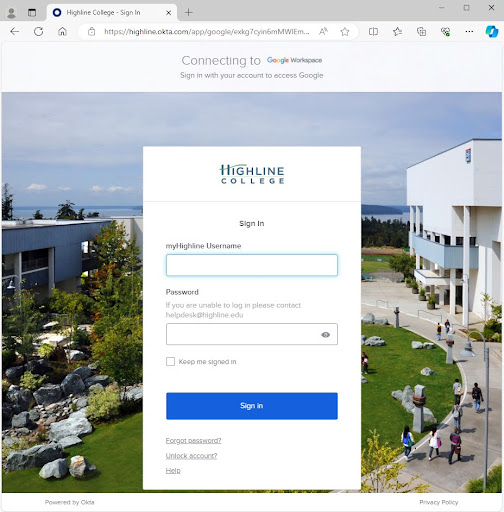
myHighline Okta log in screen. If you are unable to log in, contact helpdesk@highline.edu. There are links to 'Forgot Password?' 'Lock Account' and 'Help' under the Sing in button

Step 6

Review the ‘Sign in to texthelp.com’ screen, then select ‘Continue.’
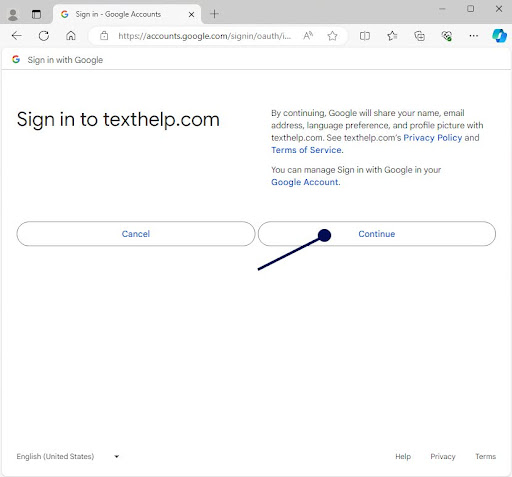
Screenshot of Windows web browser showing the Sign in the texthelp,com webpage, notifying you that by signing in, Google will be sharing your name, email, address, language preferences, and profile picture with texthelp,com. There are links to the Google Privacy Policy and Terms of Service. You can manage your Sing in With Google via a link provided. There is a cancel button and a continue button.

Step 7

Read&Write should now be activated and presenting a menu bar at the top of your desktop.

Windows Read&Write menu bar that displays at the top of your desktop

Step 1

To active your Read&Write on Windows using your Microsoft 365 account, start by launching the Read&Write app.

Screenshot of the Windows desktop icon for the Read&Write app

Step 2

Select Read&Write (rw) icon from the menu presented.

Screenshot of Read&Write app menu to activate account

Step 3

The Read&Write activation page will open in your default web browser.

Select ‘Sign in with Microsoft.’
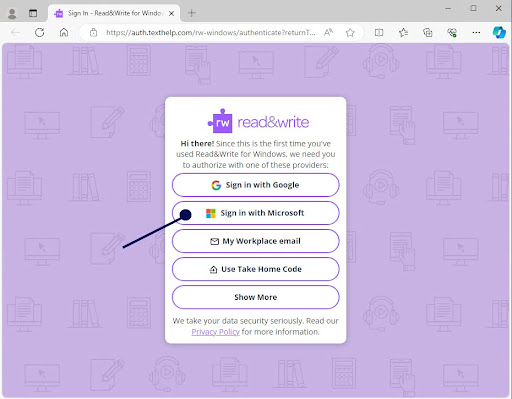
Screenshot of web browser showing the Read&Write log in page with the following option to sign in: Google, Microsoft, Workplace Email (with an arrow pointing to it), Home Code, and Show More. There is a link to their privacy policy at the bottom.

Step 4

On the next screen, enter your @Highline.edu or @Students.Highline.edu email address, then select ‘Next.’
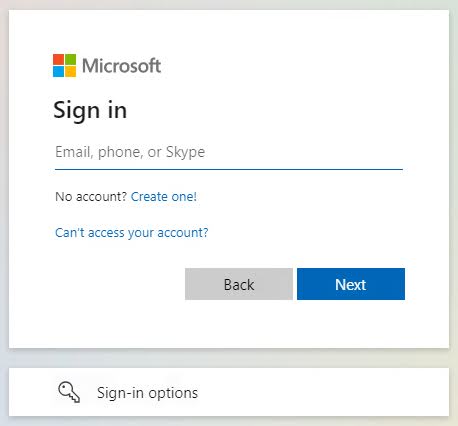
Screenshot of the Windows Microsoft Sign In screen asking for email, phone, or Skype. Enter your highline email and click next.

Step 5

If prompted, select ‘Work or School Account.’
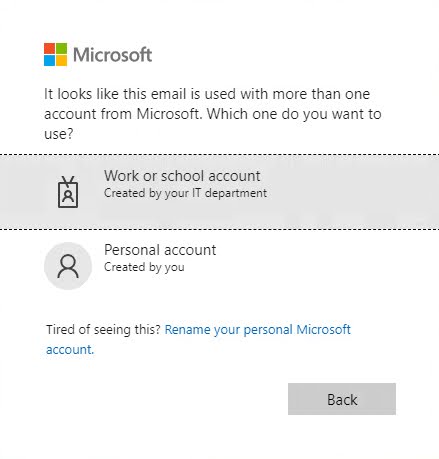
Screenshot of a Windows Microsoft prompt that may come up, stating that this email is used with more than one account with Microsoft. It asks if this is a 'Work or School Account' (created by your IT department) or a 'Personal Account' (created by you). Select 'Work or School Account.' You can also select the 'Back' button if you choose.

Step 6

You will be redirected to the Highline College Okta Login screen, enter myHighline username and password, then select ‘Sign In.’
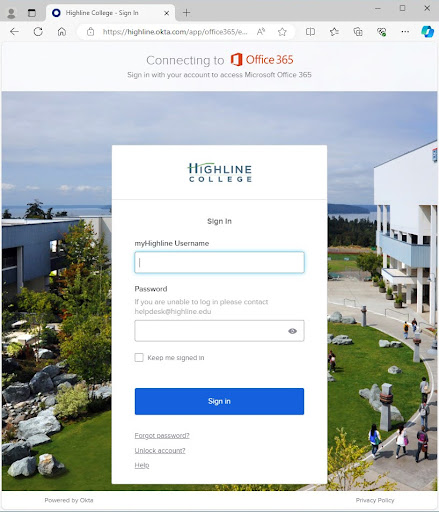
Screenshot of Windows web browser at the Highline Okta log in screen for Microsoft 365, asking for your myHighline username and password. If you are unable to log in, contact helpdesk@highline,edu

Step 7

Read&Write should now be activated and presenting a menu bar at the top of your desktop.

Windows Read&Write menu bar that displays at the top of your desktop

Step 1

To active your Read&Write on MacOS using your Google account, start by launching the Read&Write app.

Select the red ‘Sign in with Google’ button.
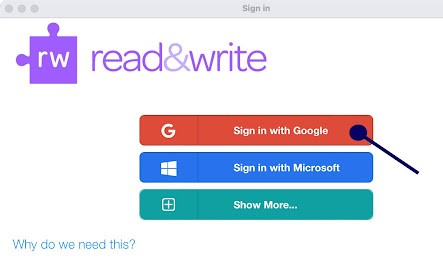
Screenshot of the MacOS web browser Read&Write log in screen with the an arrow pointing to the option 'Sign in with Google.' Other options are 'Sign in with Microsoft' and 'Show More'. There is a link that says 'Why do we need this?'

Step 2

When prompted to sign in to your google account, enter your @Highline.edu or @Students.Highline.edu email address.
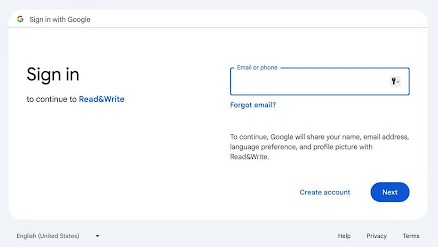
MacOS read&write Google sign in page, asking for your phone number or email address. It states that my signing in, Google will share your name, email address, language preferences, and profile picture with read&write. Use your Highline email. Offers links to the Google Privacy Policy and Terms of Service. , as well at the Help page, on the bottom.

Step 3

There are two different login prompts depending on whether you are activating with a Student (@students.highline.edu) or Staff & Faculty (@highline.edu) account.

  • Student Accounts (@students.highline.edu), enter your myHighline account password when prompted to enter your password, then select ‘Next.’
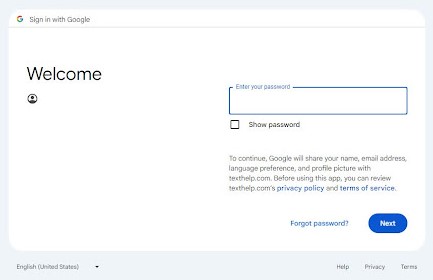
Screenshot of MacOS web browser on the Read&Writelog in screen for Highline Students to enter their password, with a 'Forgot Password' link. It notes that by signing in, Google will share your name, email address, language preferences, and profile picture with texthelp.com, and has links to their Privacy Policy and Terms of Service. There is a link to the Help page on the bottom.

  • Staff & Faculty Accounts (@highline.edu) will be redirected to the Highline College Okta Login screen, enter your myHighline username and password, then select ‘Sign In.’
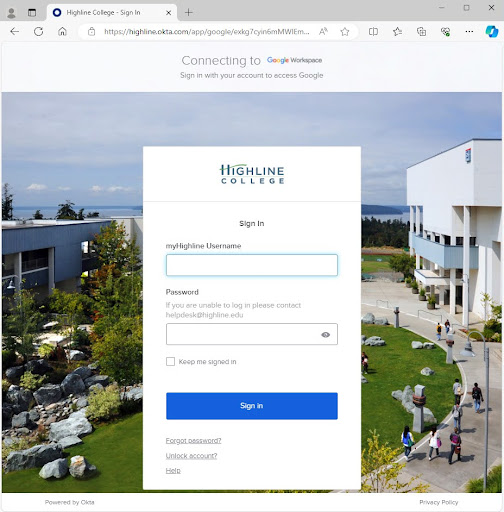
Screenshot of MacOS web browser on the myHighline Okta log in screen. If you are unable to log in, contact helpdesk@highline.edu. There is a link for 'Forgot Password' and 'Unlock Account' as well as the 'Help' page.

Step 4

Review the ‘Sign in to texthelp.com’ screen, then select ‘Continue.’
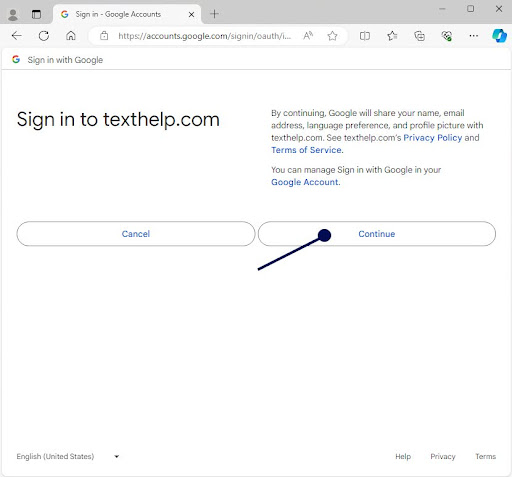
Screenshot of MacOS web browser on the 'Sign in to texthelp.com' screen., with an arrow pointing to the 'Continue' button.

Step 5

Read&Write should now be activated and presenting a menu bar at the top of your desktop.

The MacOS Read&Write menu bar that displays at the top of your desktop

Step 1

To active your Read&Write on MacOS using your Microsoft 365 account, start by launching the Read&Write app.

Select ‘Sign in with Microsoft.’
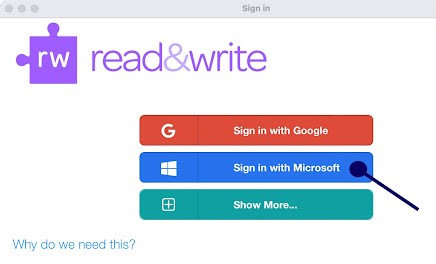
Screenshot of MacOS web browser on the Read&Write sign in page, with the options to sign in with Google, Microsoft (with an arrow pointing to this option), and 'Show More'. Select the Microsoft button. There is also a link that says 'Why do we need this?'

Step 2

When prompted, enter your @Highline.edu or @Students.Highline.edu email address.

Screenshot of the Windows Microsoft Sign In screen asking for email, phone, or Skype. Enter your highline email and click next.

Step 4

If prompted, select ‘Work or School Account.’

Screenshot of a Windows Microsoft prompt that may come up, stating that this email is used with more than one account with Microsoft. It asks if this is a 'Work or School Account' (created by your IT department) or a 'Personal Account' (created by you). Select 'Work or School Account.' You can also select the 'Back' button if you choose.

Step 5

You will be redirected to the Highline College Okta Login screen. Enter your myHighline username and password, then select ‘Sign In.’
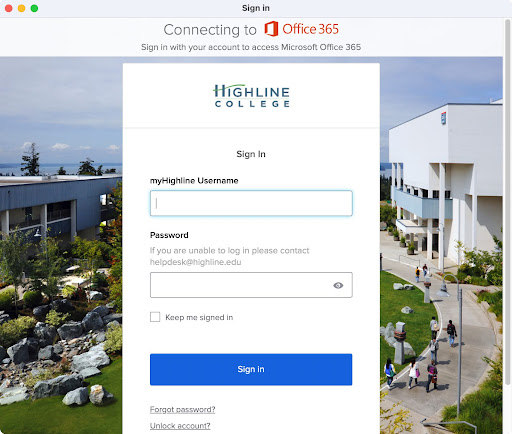
Screenshot of MacOS web browser at the Highline Okta log in screen for Microsoft 365, asking for your myHighline username and password. If you are unable to log in, contact helpdesk@highline,edu

Step 6

Read&Write should now be activated and presenting a menu bar at the top of your desktop.

The MacOS Read&Write menu bar that displays at the top of your desktop

Additional Resources

Questions?