Improved Security Recommendations for Zoom Meetings
As the use of Zoom has increased, so has the incidence of “Zoom bombings,” where unwanted visitors enter a meeting room and start sharing the screen. As a precaution, all meetings default to the setting that allows for the Host-only to share screen. Because of this and other security concerns, this guide makes recommendations on Zoom usage for you and your students.
- See also: Highline Zoom Guide
Do not publish your Zoom meeting room links on public pages.
This is especially true of your personal meeting link that is associated with your Zoom account. Post zoom links within your Canvas Course. With Zoom, you can create unique meeting links. If you want to publish a zoom link publicly then it is recommended to create a unique meeting link for your lectures and/or office hours.
When possible use the waiting room feature.
This may not be feasible to spend time letting people in for each lecture, so use a unique zoom link for you class by creating a recurring meeting in Zoom. When setting up a recurring meeting you can change the settings to allow participants in without you as host letting them in. If someone unwanted gets in, you can create a new link for the class to be used in the following lecture.
Ask students to use their names as shown in Canvas or Class Rosters.
Sometimes students will use nicknames or online screen names when attending a zoom session. Let students know if their name is unrecognizable they may not be let into the zoom session. There will be instances where Zoom will grab the phone or computer name.
Unfortunately, someone can type in any name they choose when joining a session. If someone really wants to, when they create a zoom account they can use a false name. We cannot control someone else’s behavior but we can remove unwanted attendees in meeting rooms. You’ll have to use good judgment. If you aren’t expecting your Vice President to show up in your online office hours or class lectures it’s a good chance that’s not who’s trying to get into your meeting room.
Create Meeting links instead of using your personal meeting room.
If you want to publish your online office hours or class lectures in the directory, it is recommended you create a unique meeting link for office hours or classes. If the link is used by an unwanted visitor, you can easily create a new link within Zoom and send to your students.
Make Use of Passwords
You can create a password for the zoom link you create for your class. If it is a problem with students distributing meeting controls, password protection won’t help much. However, if you have a fixed meeting ID, it may work to change the password each session, shortly before the Meeting.
For added security, you can choose to create a recurring meeting for your lectures, office hours or any type of regular meeting. Zoom will create a meeting link for each scheduled meeting. Follow the steps below to create a recurring meeting. These steps assume you have downloaded the application to your desktop.
Step 1
Open Zoom and from your home page select Schedule

Step 2
Complete the next 3 steps on the pop-up page:
- Give your Meeting a Topic. This will show up in the Subject Line in the invite
- Select ‘Recurring Meeting.’ This tells Zoom not to delete this meeting after the initial occurrence. How often or the length of the meeting doesn’t matter to Zoom. You will set the recurrence in your outlook calendar.
- Select ‘Generate Automatically.’ This gives the meeting a unique link to use. This link will stay the same for each recurrence.

Step 3
Once you select ‘Schedule,’ an Outlook invite will open with all the Zoom Meeting information already filled in. The link provided for “Join Zoom Meeting” is what you want to share with meeting participants. This meeting link will not change for this invitation even if you edit the invitation at a later date.

Step 4
To schedule the recurrence on your calendar, select the ‘Recurrence’ option at the top of the invite.

Step 5
You can set the recurrence based on the frequency of the meeting. In this example the class is every Tuesday and Thursday from 10:00 AM – 10:50 AM and it is scheduled to go through the end of Spring Quarter.

Step 6
You do not need to send the invite to anyone. You can save and close, so that the recurrence is on your calendar at the scheduled times.

Additional Notes
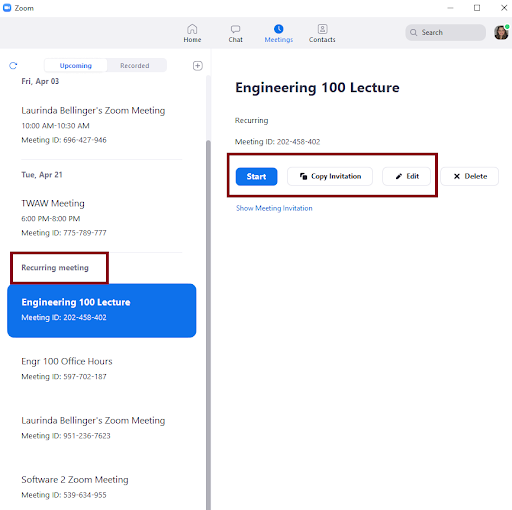
- You can verify the recurrence on your outlook calendar. In this example, a unique link was created for the “Engineering 100 Lecture Class” recurring every Tuesday & Thursday at 10:00 AM – 10:50 AM. Another recurring meeting was created for the weekly office hours. You can use the same link for office hours for any appointment meeting you may have with students.
- In your Zoom Meetings Page you will see a list of recurring meetings on the right.
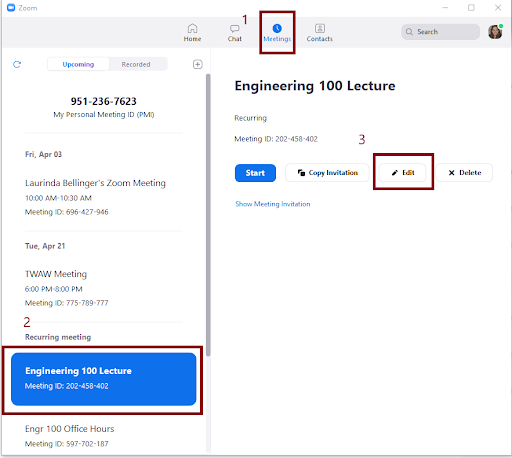
Step 1
After opening up Zoom, you need to select the meeting you wish to edit on the left side of the screen and then select ‘Edit.’
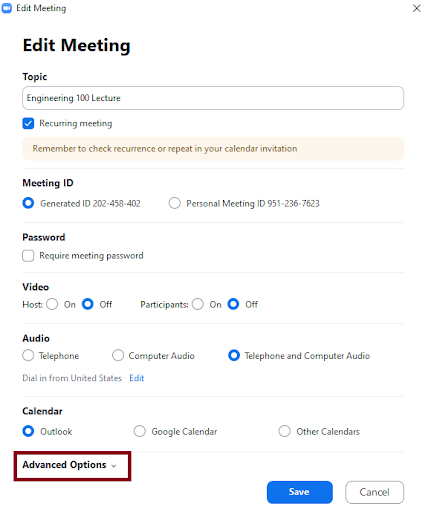
Step 2
The Edit Meeting box will appear and you want to select ‘Advanced Options’ at the bottom.
Step 3
You can Enable or Disable Waiting Room options by selecting the option. It is good practice to check this feature to enable it. In large participant meetings, unless you have a co-host, this becomes difficult to manage when participants show up late. You can disable this feature at any time.

Step 4
Select ‘Save’ and you are done.
This section will step you through the process of making a participant a host so they can share the screen or removing a participant.
If you give someone hosting privileges you can always revoke those privileges. They will only have temporary Hosting power, but you remain the owner of the meeting.
Step 1
Open up the participant pane by selecting ‘Manage Participants’ at the bottom of your screen

Step 2
Once this pane is open you can scroll over the person you wish to remove and the ‘More’ button will appear

Step 3
Select ‘More’ by clicking on it. Several options for the participant appear. You can make them a host so they can share their screen or remove them.

- When they are done sharing, you can remove their hosting ability.
- A removed participant could try to reenter with another name. So use caution if you get another notice for someone in your waiting room.
- Security Icon added to Host’s meeting controls; Includes Locking meeting, Share Screen, video etc. When locking a meeting, no new participants can join.
- If the Host of the meeting unchecks ‘Start Video’ then anyone in the main room will not be able to start their video.
- This does not affect participants in breakout rooms. In breakout rooms, only an assigned co-host can remove a participant or shut down an individual’s video.

Step 1
Open up Zoom and from the Zoom Meeting page, select the meeting you want to add a password to and select the Edit option.

Step 2
The Edit Meeting box will open and you can under Password, check the ‘Require Meeting Password’ to enable the password function.

Step 3
Once selected, a box will appear and auto-populate a numeric password for you. You can use the auto-populated option or type in your own. If you choose an alpha-numeric option the letters will be converted to numbers so that those using a telephone to dial in can enter the password. It is the best practice to use the auto-generated password.

- After you are done entering the password, hit save and you are done. If your online meeting is ever compromised by an unwanted participant, you can repeat these steps and change the password.
- We do not recommend sending meeting passwords to students in emails. It will be most secure to post the passwords in Canvas, and you can go even further by using a service such as Privnote, Shred, or Password.Link.
Disable “Embed Password in Meeting Link”
Your profile has security settings you can enable and disable. If you require a password, Zoom will put the password in the Meeting Link it generates if this setting is enable. To Disable this feature complete the following steps:
Step 1
Open up Zoom Application or go to the Zoom Website.
Step 2
Once application is Open, click on the Settings Gear icon in upper right corner under your picture/initials.

Step 3
On the general settings tab, click the ‘View More Settings’ option at the bottom

Step 4
A webpage will open to your Zoom Personal Profile. On the left hand column, select ‘Settings.’

Step 5
Under ‘Meeting’ in the main column scroll down until you see “Embed Password in Meeting link for One-Click Join” . In the figure below, the functionality is Enabled. To disable it click it and the icon will change color from blue to grey and switch will to the left.

Step 5
There is no save button so once this is complete you are done. Any previous meeting links created will NOT have this functionality disabled so you should go and re-create any meeting links for you recurring meetings or classes
- This can only be done in the Zoom Web Portal
- This allows the host of the meeting to collect names, email addresses and date & time of registration. Zoom stores this information for 30 days after meeting.
- Registration can have automatic or manual approval of those who sign up.
- For more information see ‘Scheduling a Meeting with Registration’
To check the current version of your Zoom client, do one of the following:
- Start the Zoom app (search for “Zoom” on your desktop and start Zoom.app). The version number will be displayed on the splash screen.
- While in a Zoom meeting, click the green shield icon in the upper left of the screen. It will open Settings, Statistics, and the current client version will be displayed there.
- Current Zoom Client version as of 6/15/2026 is: 7.0.5. If you have an older version, we recommend updating:
- Open Zoom Client
- Click on your initials or picture in upper right corner
- When the menu appears, select “Check for Updates.”
Questions?
- Please contact the Help Desk.