
Watermark Tutorial
Setting Office Hours & Scheduling Student Appointments
Watermark’s meeting scheduler allows students to set up meetings with their instructors. There are two options for faculty to use:
- Faculty Advising – enables students to schedule advising appointments; and
- Office Hours – preferable when enabling students to schedule office hour visits.
A few key points:
- The meeting tool automatically syncs up with your calendar and will not allow students to schedule meetings for times you already have blocked out.
- Virtual and face-to-face meeting availability can be scheduled at the same times of day, but need to be entered separately.
You can overlap multiple types of meetings. For instance, you can have both faculty advising hours and office hours overlap; Watermark will help give you information about what type of meeting the student requested.
- Return to the Faculty and Staff Guide to Watermark
Set Your Available Times for Student Appointments
The first step in this process is to set available times for students to request meetings. These time slots will be presented to students when they request a type of meeting with you. Remember, you can overlap the meeting types.
For instance, a meeting schedule might look like:
- Virtual Office Hours and Face-to-Face Office Hours are available from 1:00pm-2:00pm on Tuesdays, because you know you will be in your office.
- Virtual Office Hours and Virtual Faculty Advising are both available from 1:00-2:00pm on Wednesday; you know you’ll be off-campus, but are willing to meet with students either about courses, or about advising.
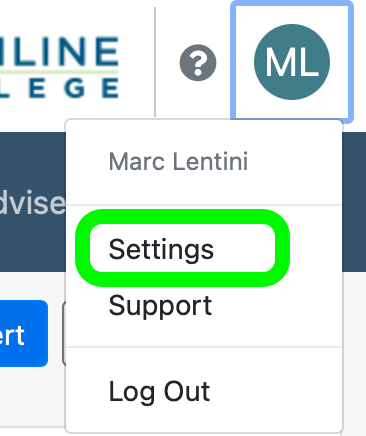
Step 1
From the Watermark home screen, click your profile circle icon in the top right corner, then click ‘Settings’ from the drop-down menu.
Step 2
Once in ‘Settings,’ scroll down until you find ‘Meeting Request Locations.’ Check the box next to ‘Accept scheduled meetings from students.’
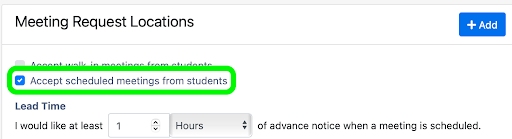
Step 3
Fill in your desired ‘Lead Time.’ This determines how much advance notice you want before a meeting.
- You will need enough time to confirm and provide instructions to the student, but not so much that you’re not available when a student needs it.
- Your department or division may have guidelines. In the absence of other guidance, we recommend 24 hours.

Add Meeting Locations (Services)
Watermark refers to the services provided as ‘Locations.’
Both Faculty Advising and Office Hours will have two entries – one for face-to-face meetings, and one for virtual meetings. You’ll have to set up Locations for each meeting mode, and each type of meeting that you want to offer. While tedious, it also gives you tons of control over what type of meeting you want to make available, and what mode you want for those meetings.
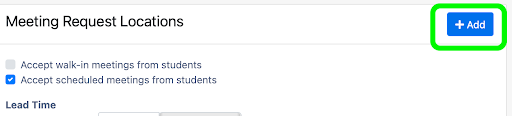
Step 1
Click the blue ‘+Add’ button, which is at the top right of the ‘Meeting Request Locations’ box.
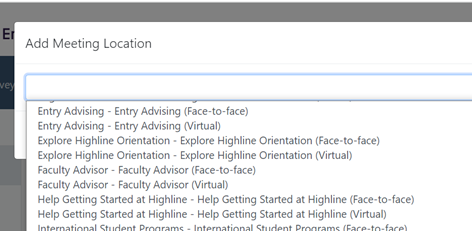
Step 2
Select the appropriate service location from the drop-down menu. Remember, there are two locations for each category, Virtual and Face-to-face.
- Note: Faculty Advisors should select ‘Faculty Advisor – Faculty Advisor.’
Step 3
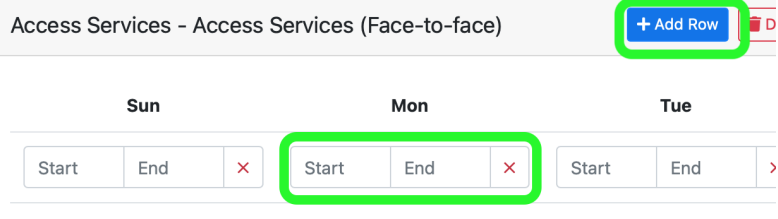
For each time block you are available, click on the Start and End times, and fill in when you want to be available to meet with students.
- If you want multiple time blocks during a day (e.g. 1:00-2:00pm, and 3:00-4:00pm), click on the ‘Add Row’ button next to the location name.
Step 4
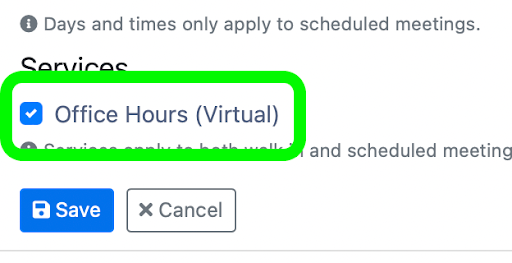
Make sure you check the box to make the virtual meeting times are available to students. Depending on the service you may see different options, but here are two examples:
and

Step 5
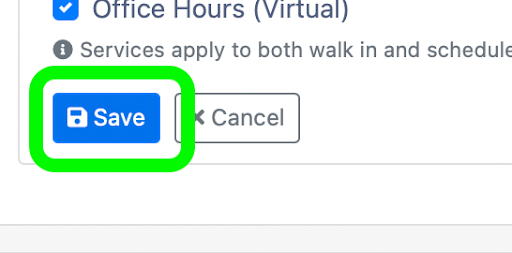
Click ‘Save’ to apply your settings. Students will now be able to schedule meetings with you.
Optional: Add Another Location
To add another location, click on the “+Add” button at the top right of the Meeting Request Locations settings again, and repeat the rest of the steps.

Tell Students Where to Meet You
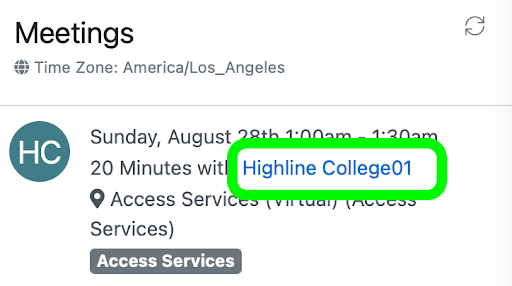
Once a student requests a meeting, it will appear in three places:
- On the Watermark Dashboard, in the ‘Meetings’ module
- In Outlook Calendar
- Sent to Highline email
Important: The meeting will not include information about where the meeting is going to be. You will need to send those details to the student.
- You will need to update the meeting information in Watermark by adding a comment
- We recommend sending the information 24-48 hours before the meeting, which also serves as a reminder to the student about the meeting
Step 1
Find the meeting module on your dashboard, and click on the student’s name in the meeting notification. You can also look up the student from your Caseload or the search.
Step 2
Scroll down in the student’s list of meetings until you find the correct meeting. Newly scheduled meetings will have the word “Scheduled” in their entry. Click ‘Edit.’

Step 3
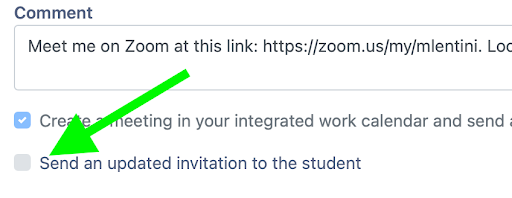
In the comments box, enter your instructions.
- Use a text/keyboard expander snippet, or keep the text of your reminder in a file so you can easily copy and paste it into meeting updates
- Using your personal Zoom Room means you don’t have to set up individual meetings for each student. Turn on the Waiting Room feature to ensure that only the student you’re scheduled to meet with is allowed in the room. Check out the Zoom Guide for more tips and information.

Step 4
Important: Click the ‘Send an updated invitation to the student’ checkbox at the bottom of the window. If you don’t, the student won’t receive the updated instructions.
Step 5
Click ‘Save’ to send the information to the student. You will also receive an updated invitation.

Questions?
- Please contact the Help Desk.