myHighline
Student Account Activation Guide
Before you begin activation, you will need:
- Your 9-digit ctcLink Student ID number (in the Welcome email from the Admissions Office)
- Your Activation Code (in an email from the ITS Help Desk)
If you are missing your ctcLink Student ID number:
- You can contact the Admissions Office at admissions@highline.edu with your full name, date of birth, address, and application number (if available), preferably from the email address listed on your application.
If you are missing your myHighline Activation Code:
- You can request an Activation Link through the Self-Service option on the myHighline Student Account Activation form (see Step 1).
If you already have a myHighline account but do not have the password:
- Check the Highline Password Help Guide
If you already have a Highline College student email (@students.highline.edu) but it has expired:
- You do not need to use an activation code to set up a new myHighline account. Contact the ITS Help Desk at helpdesk@highline.edu to reactivate your myHighline account.
Instructions
Note: Images may vary based on your device and settings.
Step 1
Start at the MyHighline Student Account Activation page (this link will open a new tab).
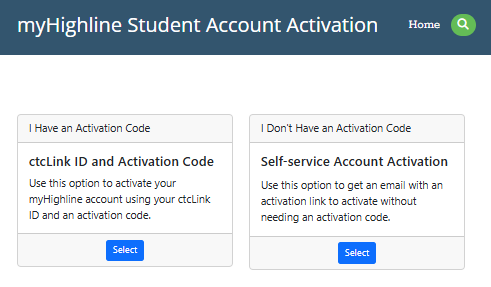
On the landing page, choose between:
- I Have an Activation Code (Step 2.A below)
- This is the code provided by an email the ITS Help Desk (helpdesk@highline.edu)
- I Don’t Have an Activation Code (Step 2.B below)
- If you do not have a code, you can request one via the Self-Service Account Activation.
Step 2.A – I Have an Activation Code
If you clicked ‘I Have an Activation Code’ you will be taken to a form requesting your 9-digit ctcLink Student ID number, and the Activation Code from the Welcome email sent to you by the ITS Help Desk.

Step 2.B – I Don’t Have an Activation Code – Part 1
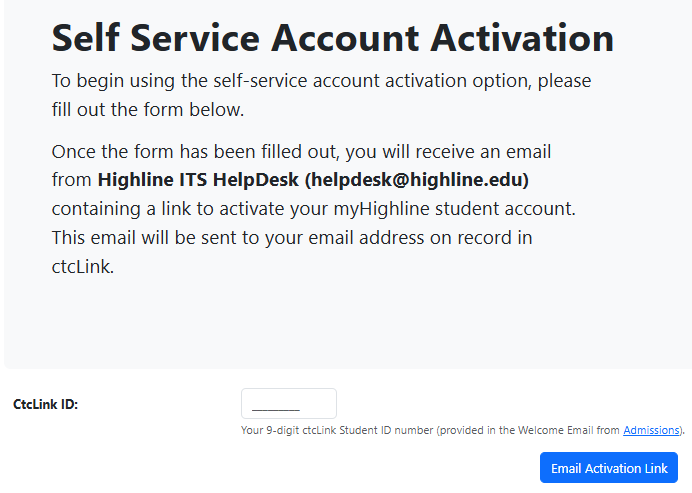
If you clicked “I Don’t Have an Activation Code” you will be taken to a form requiring your 9-digit ctcLink Student ID number.
This will be sent it to the email address you used for registration. It will come from the ITS Help Desk at helpdesk@highline.edu, subject ‘myHighline Activation Link,’ and will include an Activation Link.
Please note that this link is only active for 30 minutes, so do not fill out this form until you are ready to complete the activation process.
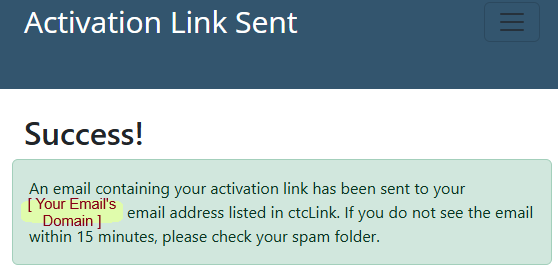
You will see confirmation that the form was successfully filled out and the Activation Link email has been sent to the email we have listed for you in ctcLink (that email’s domain will be listed. For example: highline.edu)
Step 2.B – I Don’t Have an Activation Code – Part 2
Here is an example of the Activation Link email from Help Desk. Depending on your device and email client, it may look different.
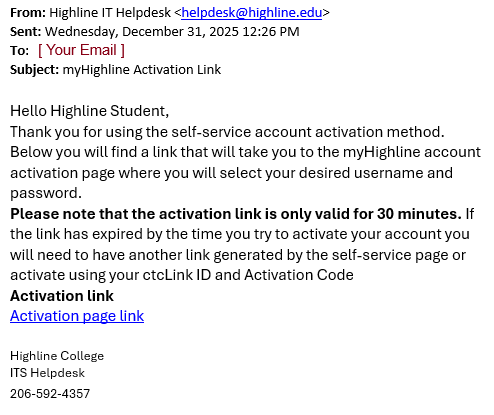
The link should take you to the Student Account Setup form. If it has expired, you will need to fill out the Self-Service form again. For any other problems, contact the ITS Help Desk.
Step 3
On entering the Student Account Setup form, you will be asked to choose a username, and check that it is available. Please consider your username carefully, as your username cannot be changed.
- This is how you will represent yourself to instructors and fellow students.
- It also might be how potential employers contact you.
- Select a username that helps people know who you are, and represents you in a professional way.
- Don’t include confidential personal information in your username, including your full first name or last name, or ctcLink Student ID number.
- You cannot use ‘Highline’ or ‘College’ in your username.
![Step 1 of the myHighline Student Account Activation form: Enter your Desired Username and Check for Availability. Enter yourr desired sername into the text box and click the 'Check Availability' box (blue text and outline on white background, with a magnifying glass icon). Username Restrictions are lists below: Must be betwen 3 and 20 characters long; Cannot be your first initial followed by your last name; Cannot include the special characters " [ ] { } ; : | + * ? < > / \ , # @ ! and cannot end with . Also mke sure your username is really what you want and keep in mind the following: Your username cannot be changed, It will be used to make your student email address, It will be how you are known in several Highline resources, It is how you will represent yourself to instructors and fellow students, and It may also be how potential employers contact you.](https://its.highline.edu/wp-content/uploads/sites/73/2025/12/myHighline-Acct-Setup-Username-1.png)
When you click the ‘Check Availability’ button, it should turn green and say “Username Available” is it is both available and fits the requirements. You can proceed to the next section.
![]()
If it turns red and says ‘Username Unavailable” you must try a different username. Check that you are following all of the username restrictions.

If it turns red and says “Invalid Username” then you must check that it fits the username restrictions.

Step 4
Make sure you securely record the username and password you choose.
Your password must meet all of the listed requirements. As you write your password, any requirements that you meet will automatically turn green.
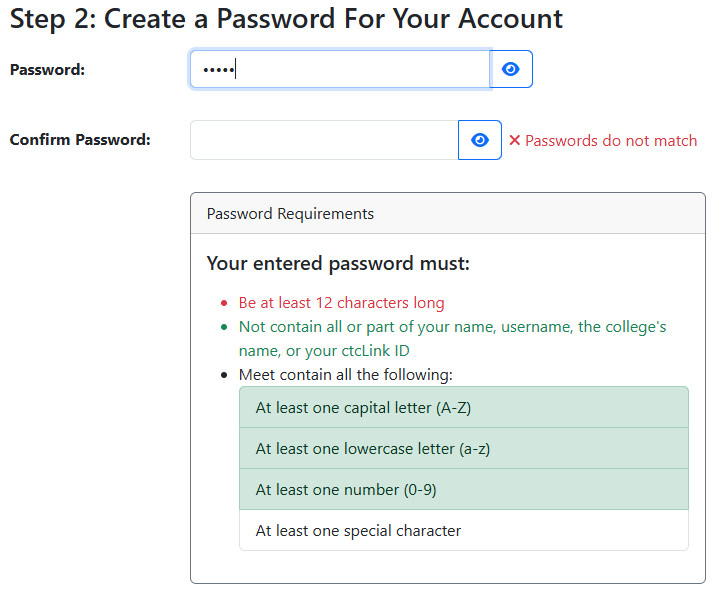
If you have any difficulty with getting the passwords to match when entering it into the second box, you can click the eye icon on the right to make the passwords visible.

Step 5
The final step to activating your myHighline Student Account is to accept the Highline College Information Technology policies and the Student Conduct Code, which you can review through the provided links.

Step 6
If the ‘Activate Account’ button has turned blue, then you have satisfied the requirements of all three sections of the form. Click it to activate your account.
![]()
If the ‘Activate Account’ button is still grey, please check that you have met the requirements of all three sections for the form. You need the username to say ‘Username Available’, the password section to say ‘Passwords match’ and to accept the Highline and ITS Acceptable Use Policies.

Step 7
You will see a confirmation of your myHighline Student Account activation with your new account details, including username and your student email address. This will also be emailed to you from the ITS Help Desk at helpdesk@highline.edu with the subject line: myHighline Account Activation Confirmation. If anything is incorrect, contact the ITS Help Desk.
There will also be further information about the kinds of Student Tools available to you.

Welcome fellow T-Bird!
Next Steps:
- Required: Set up the MFA security options on your myHighline account
- Log in to your Highline Student Email
- Attend a New Student Orientation
- Check out the key technology tools for students
Questions?
- Please contact the Help Desk.

